SharePoint Web Parts Essentials
 CNX Image Studio
Give your organization one brand image library in SharePoint: find, describe and export images in the right shape and format, and create new ones with AI.
Overview
CNX Image Studio gives your organization one place in SharePoint for its images. Find what you need by name, alt text, description, tag or color, then export it in the right size, shape and format for pages, banners and posts.
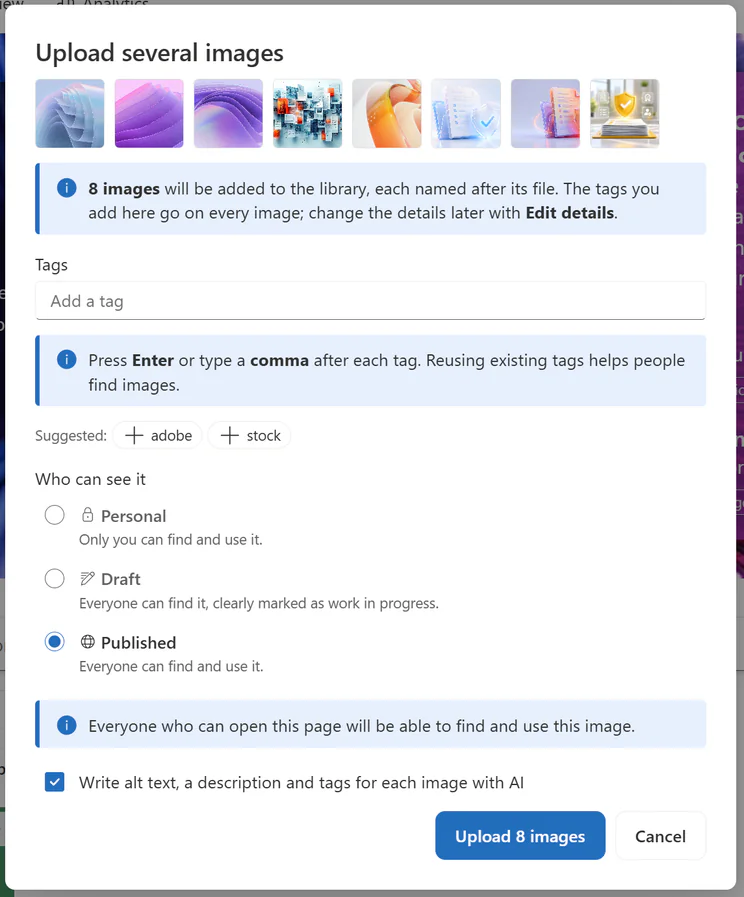
Images are stored in a SharePoint document library on your site, with alt text, a description, tags and a visibility for each one. Upload photos, SVG files, PDF, Adobe Illustrator and Photoshop files one at a time or by the hundred, and let AI write the alt text, description and tags for you.
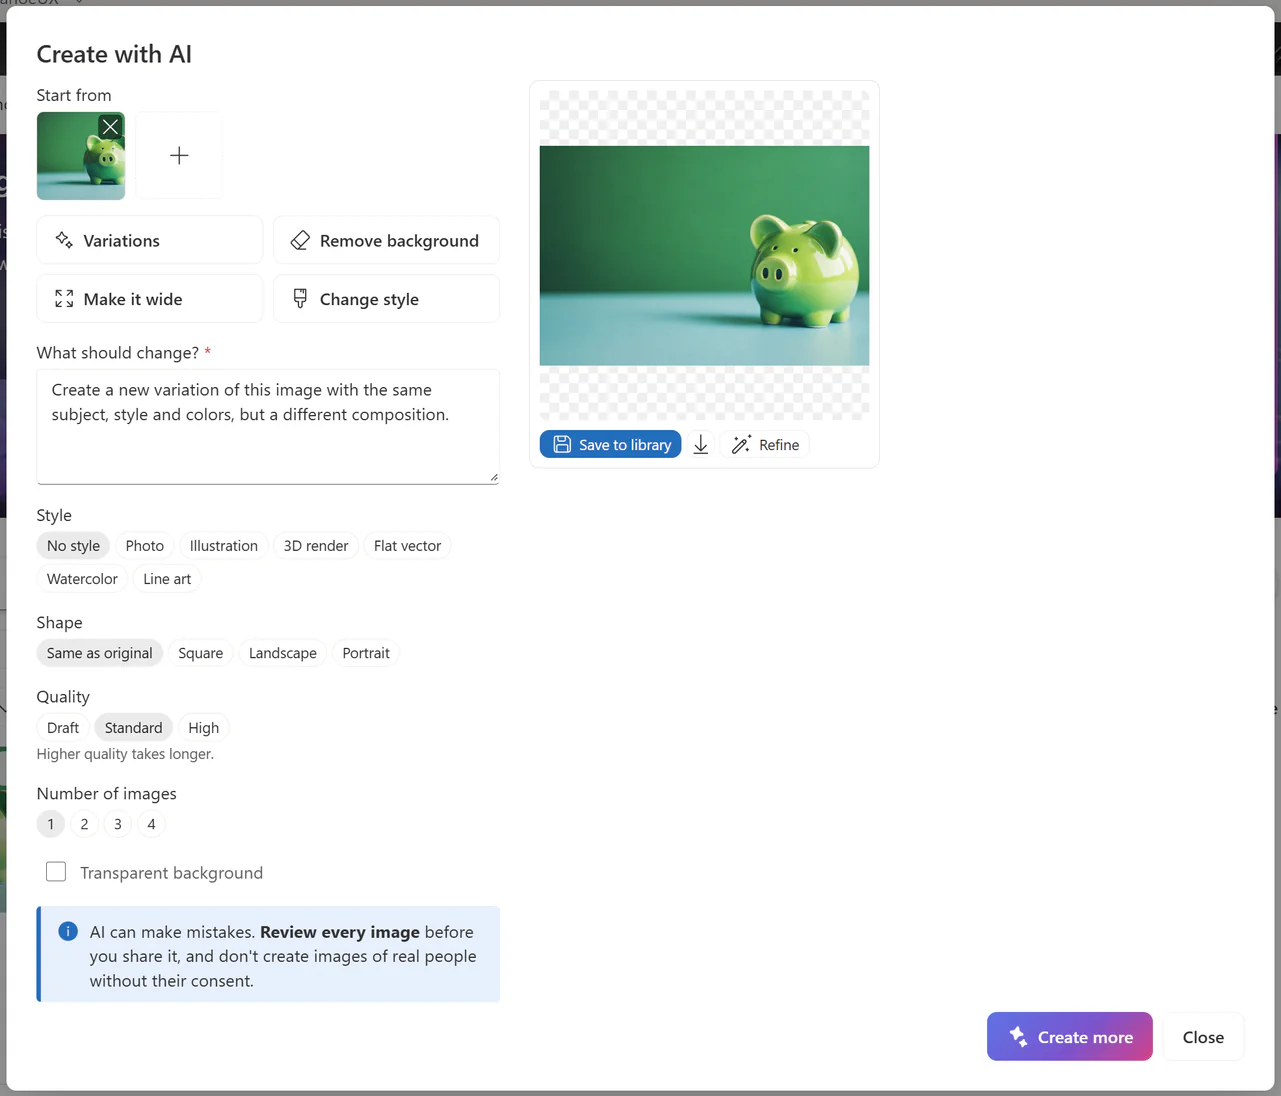
When the right image doesn't exist, AI can create it: describe it, or start from up to four images, and choose a style, shape and quality. One-click variations, background removal, widening and restyling help you adapt the images you already have.
Features
One image library
Photos (JPG, PNG, GIF, WebP and AVIF), SVG, and PDF, Adobe Illustrator and Photoshop files appear in one searchable gallery. Search by name, alt text, description, tag, color or author, and filter by type, source, shape, Added by me or, for editors, images that still need alt text.
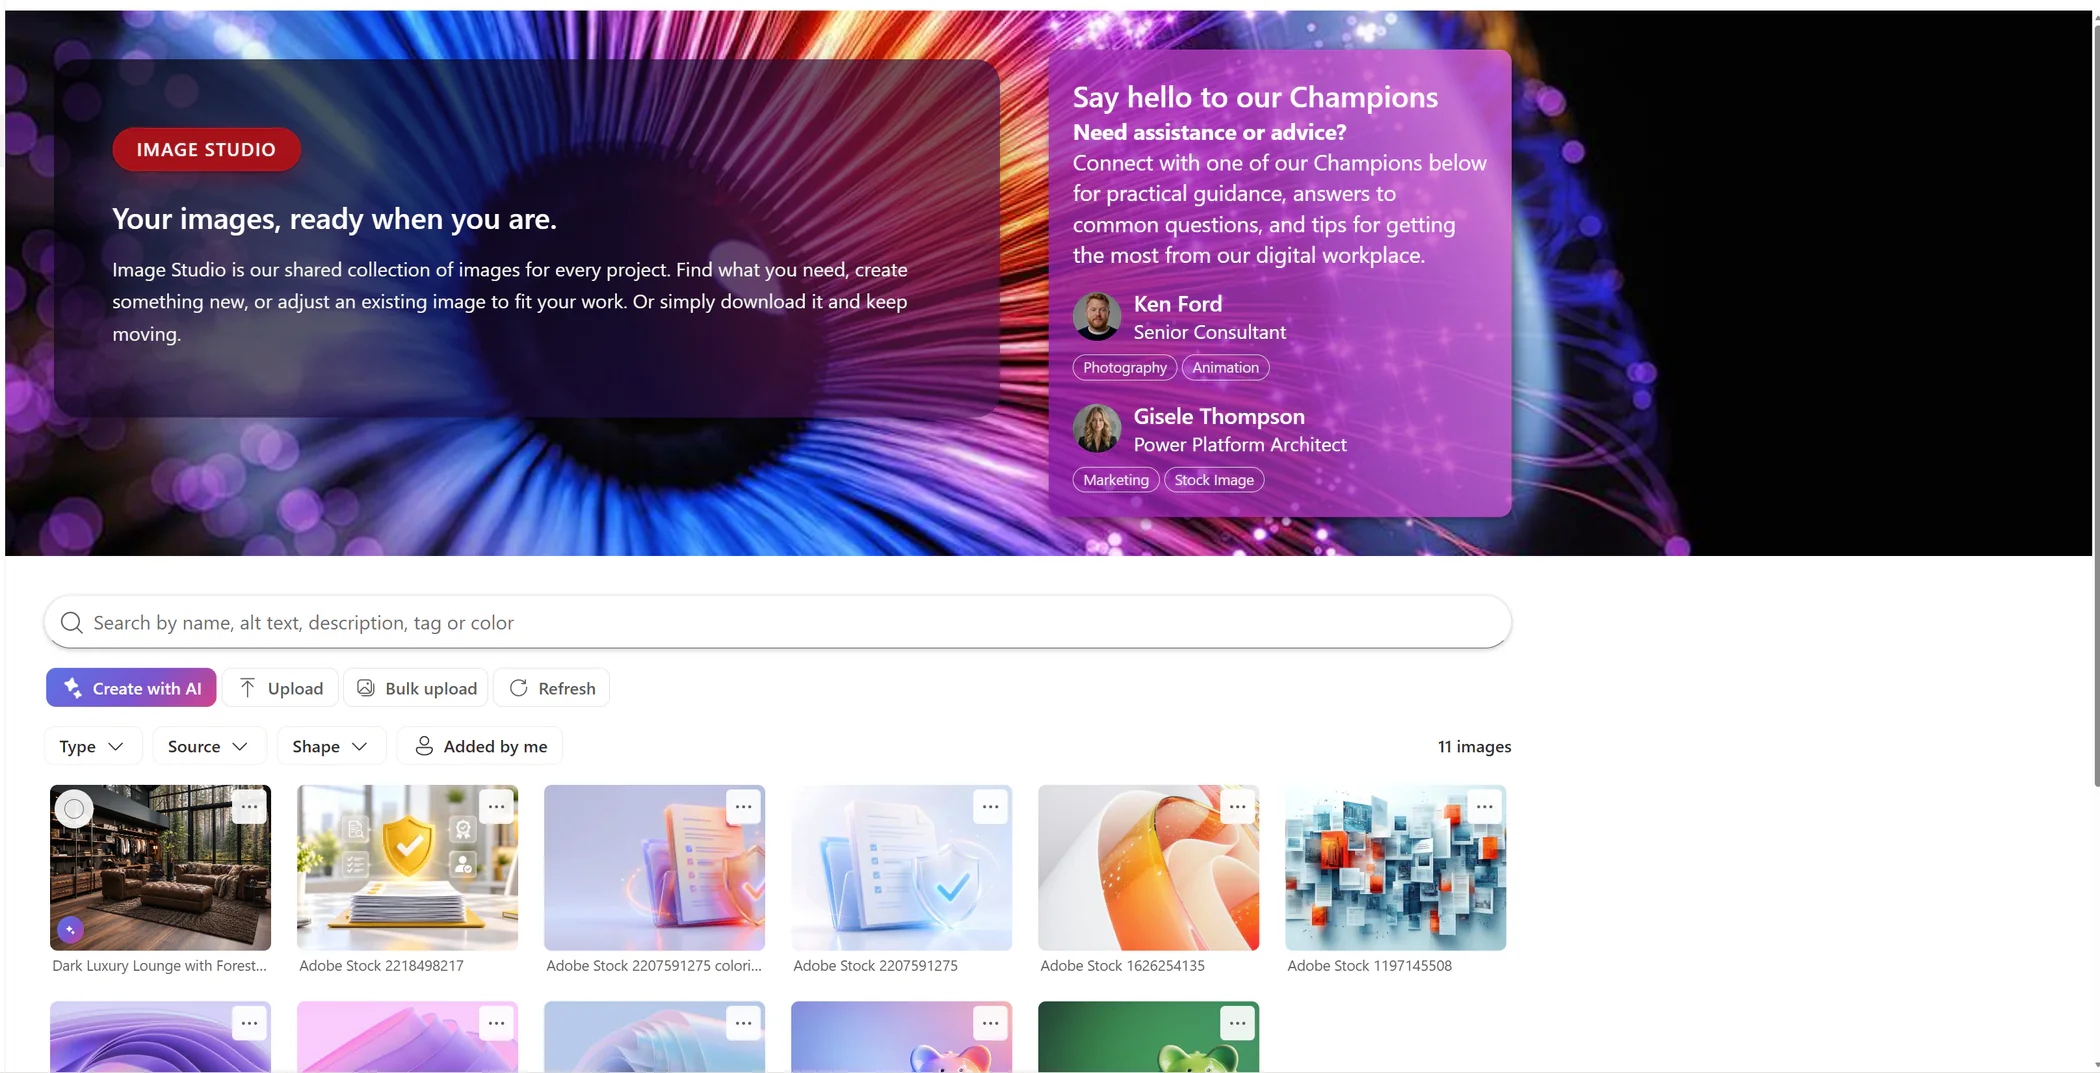
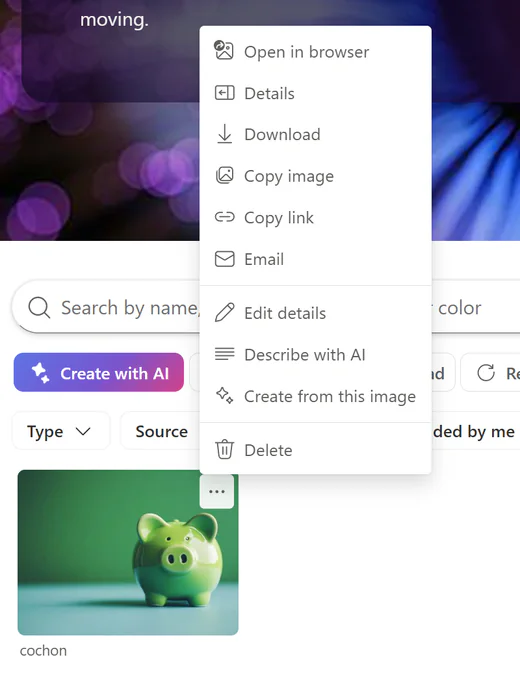
Every image's More options menu (also on right-click) offers the actions you're allowed to use: open, details, download, copy the image or its link, email, edit its details, describe it with AI, create from it, or delete it.
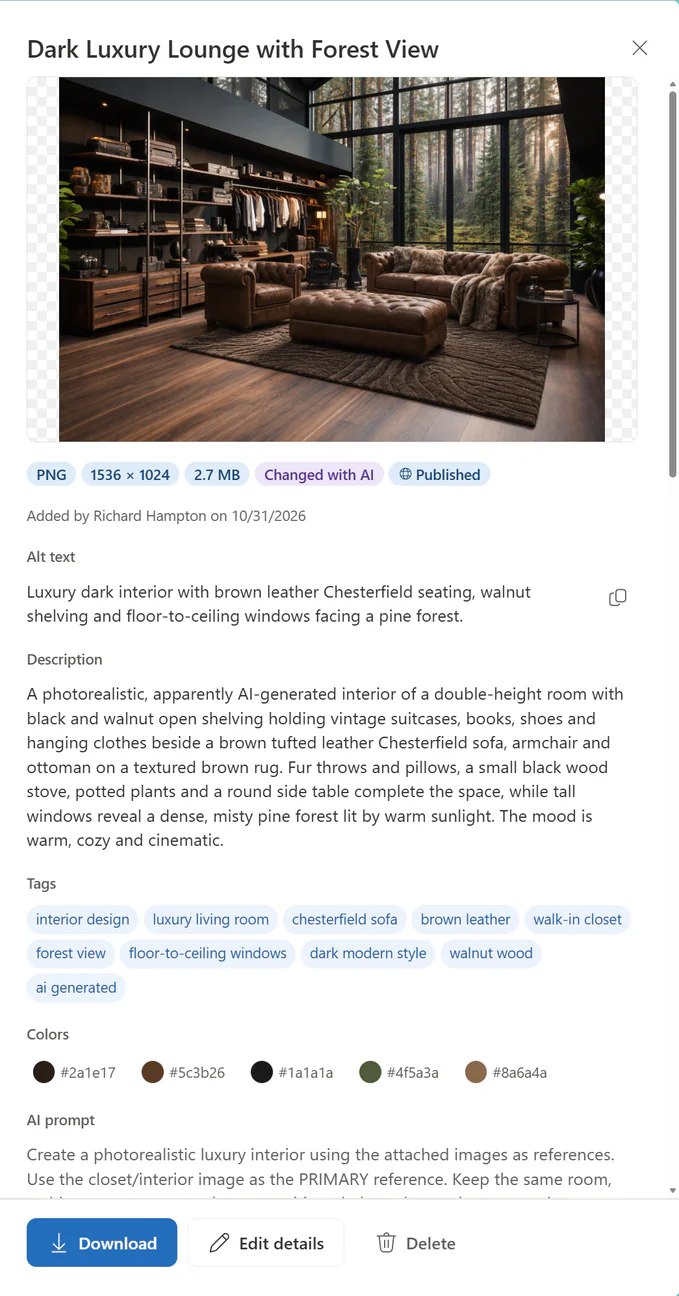
Everything about an image, in one place
Select an image to see a large preview, its format, size and visibility, who added it and when, its alt text, description, tags, colors and, for AI images, the instruction it was made from. Copy the image or its link, open it in the library, or export it.
Export for the web
Export an image as PNG, JPEG, WebP or AVIF, at the width you need, in its original shape or cropped to Wide 16:9, Banner 4:1, Classic 4:3, Square 1:1 or Portrait 4:5. The crop is centred on the image's main subject, with a live preview.
Accessible by default
Every image has alt text, and images without it are flagged for their editors. Describe with AI writes the name, alt text, description and tags in one click, finds the main colors and the subject for smart cropping, and warns you before you share an image that shows recognizable people, personal data or a logo.
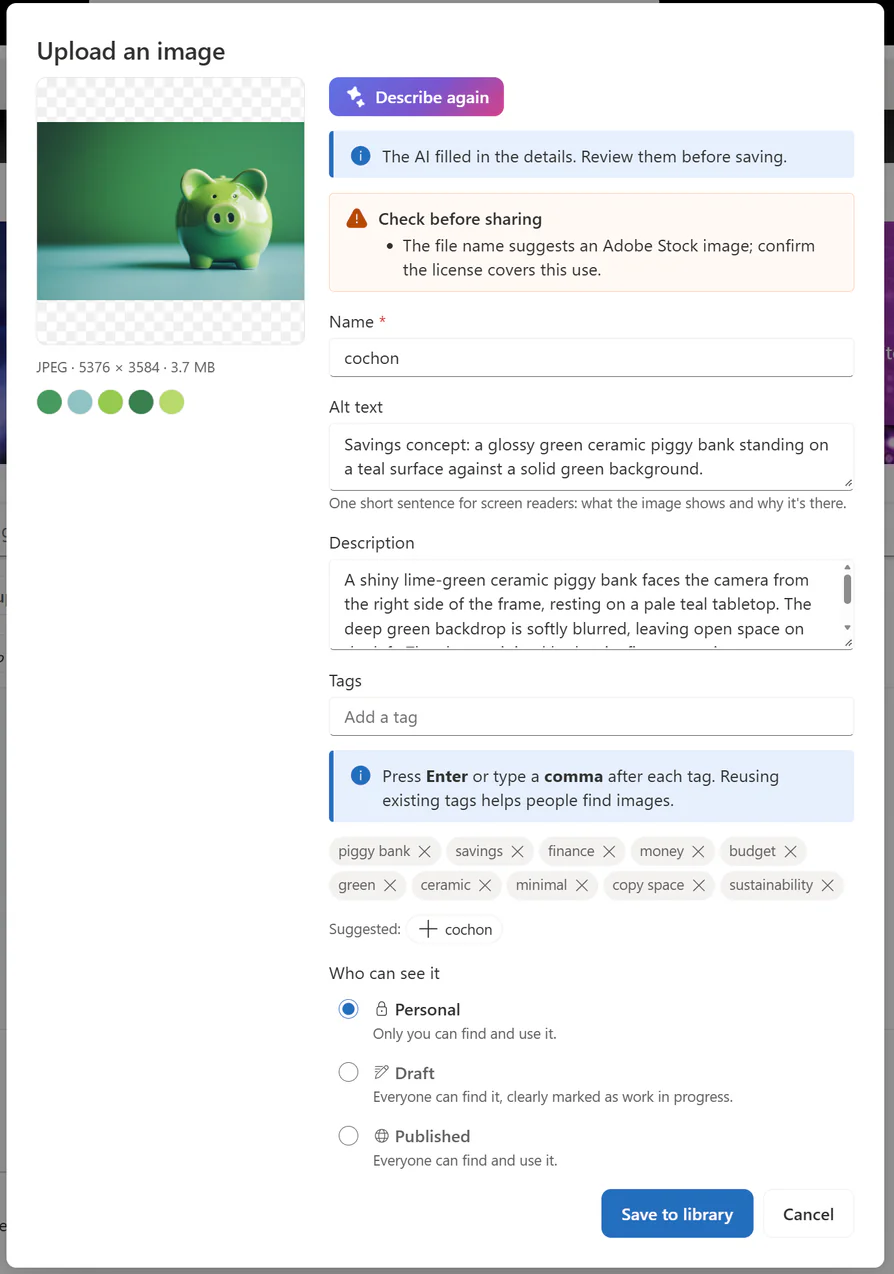
With Bulk upload, add any number of images at once, with shared tags and visibility, and let AI describe each one as it's stored.
Create and adapt images with AI
Start from an image to create Variations, Remove background, Make it wide or Change style, or describe the change you want. Choose the style, shape, quality and number of images, and review the results before you save them.
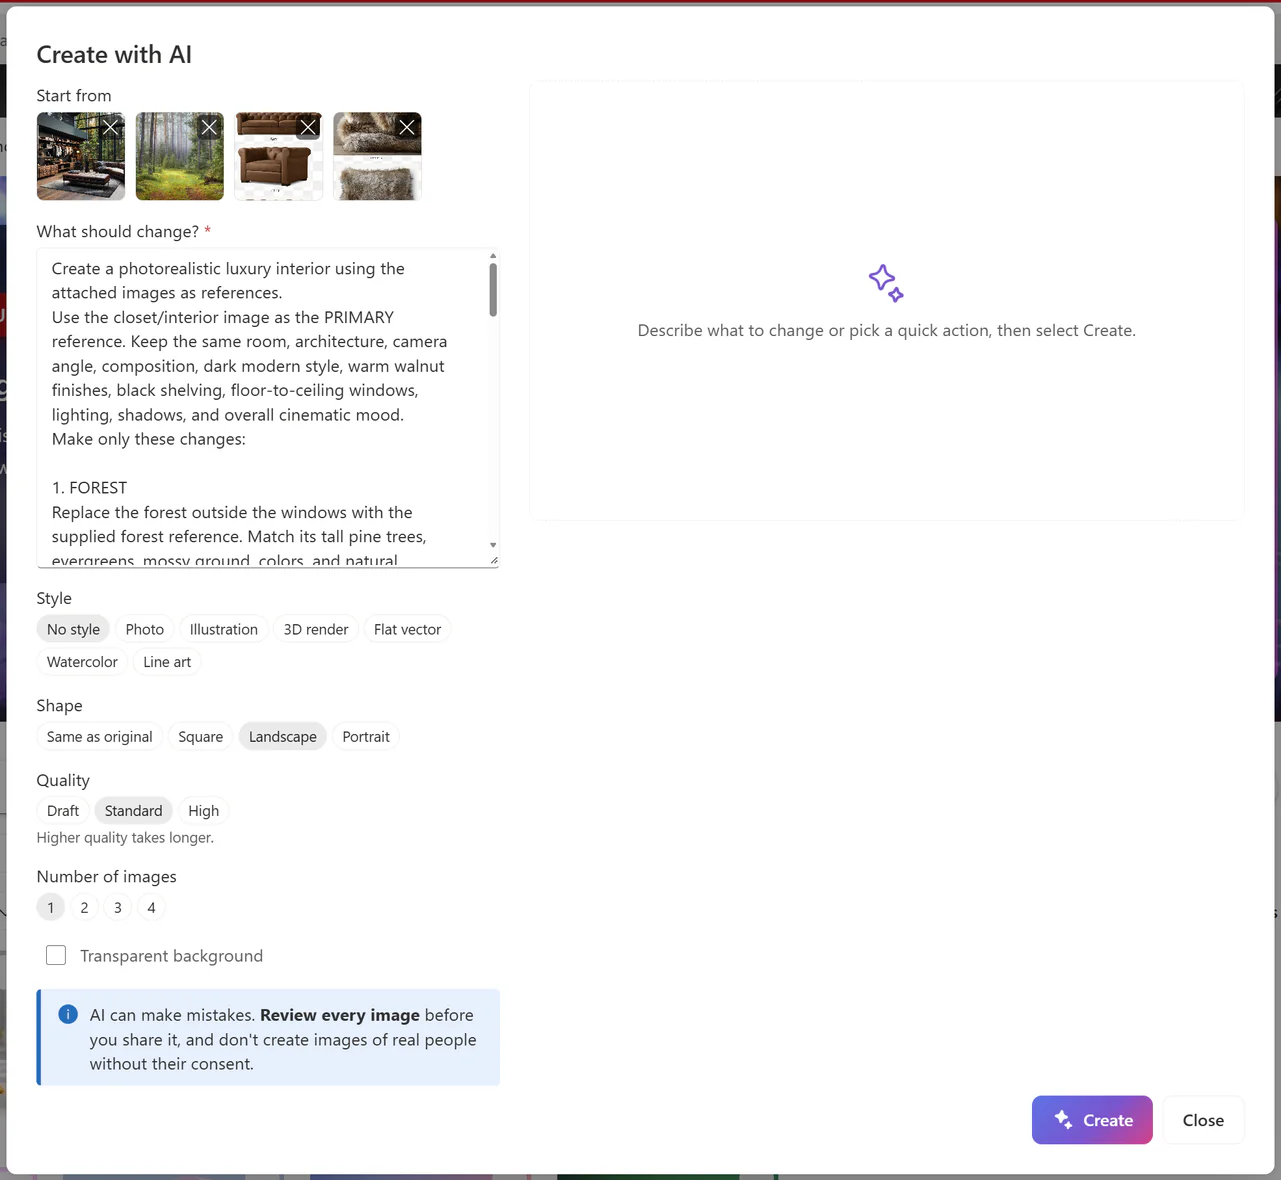
Select Create with AI to start from a description alone, or add up to four reference images, such as a room, a view and the furniture to combine. Your organization's image guidelines are sent with every request.
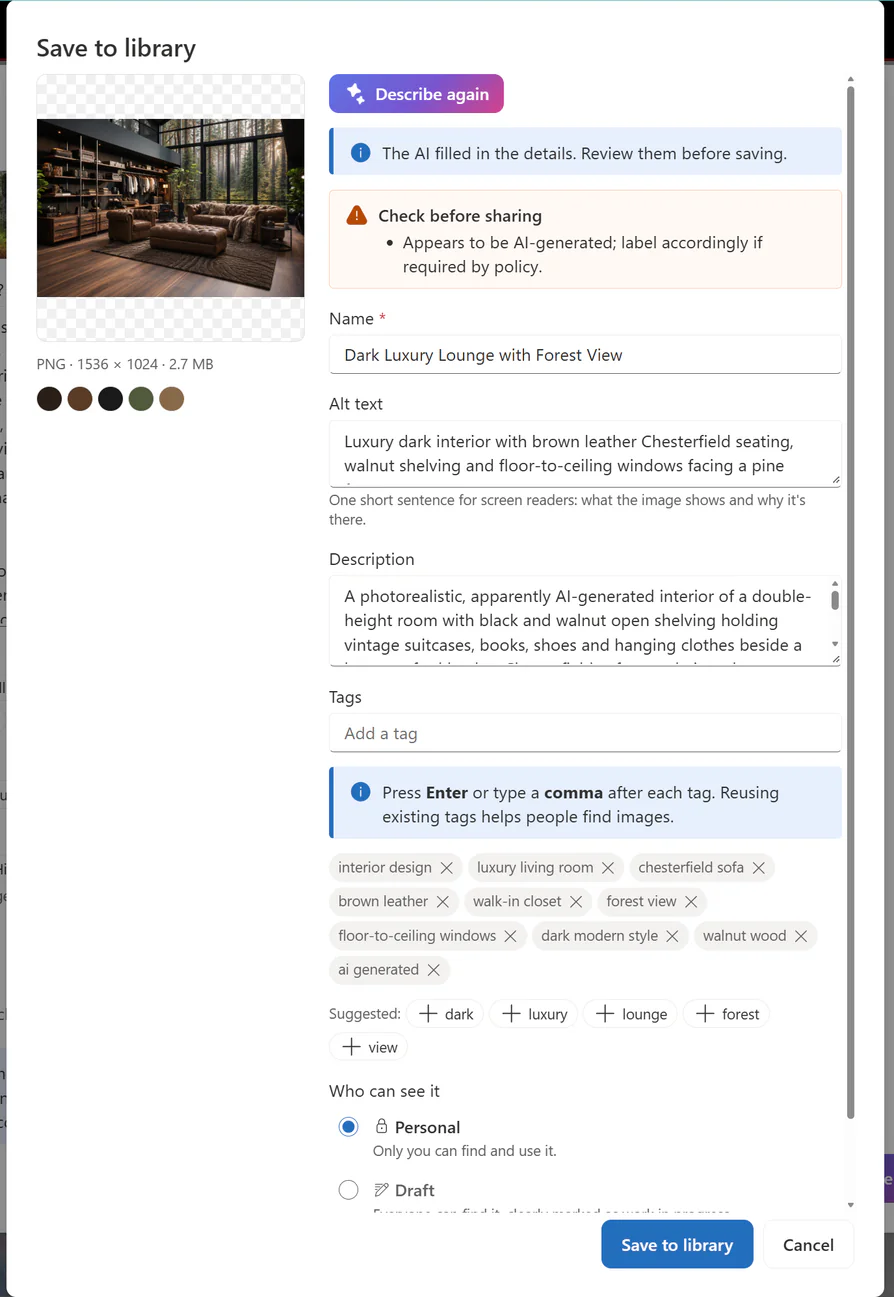
Select Save to library on the image you want: AI prepares its name, alt text, description and tags for you to review before saving, and reminds you to label it as AI-generated where your policy requires it.
Share by email
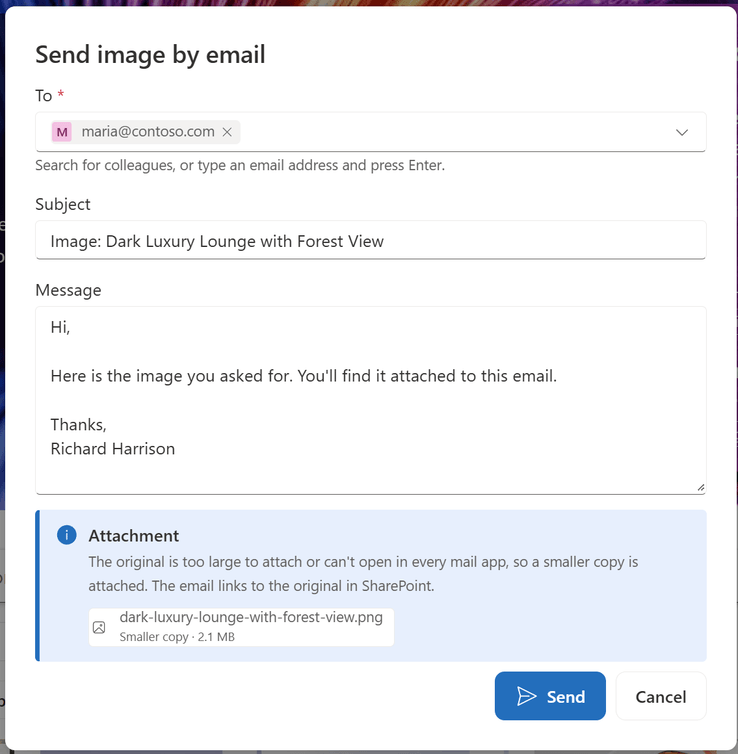
Send an image straight from SharePoint. When the original is too large to attach, a smaller copy is attached and the email links to the original.
Govern the library
Save images as Personal, Draft or Published, as in CNX Icon Studio. People with Contribute permissions change only the images they added; Edit or Full Control change them all. SVG files are cleaned of scripts, and deleted images go to the site recycle bin.
Configuration
After the CanoeUX SharePoint Web Parts Essentials package has been deployed to your SharePoint tenant, you can add CNX Image Studio to any modern SharePoint page and create the library that holds your organization's images.
Step 1: Edit the page
Create or open the SharePoint page where you want the image library, ideally on a site for your brand assets, and select Edit.
Important: The Edit button is in the upper-right corner of the page. If you don't see it, you don't have permission to edit the page: ask the site owner or a site administrator for edit permissions.
Step 2: Add the web part
In the section where you want Image Studio, select the + button to add a web part, search for CNX, and then select CNX Image Studio.
Step 3: Open the property pane
Select Open settings in the setup message, or Edit properties in the web part's toolbar. The property pane has four sections: Image library, Layout and Appearance, Export options and AI features.
Step 4: Configure the Image library section
Expand Image library. Unless your organization follows a naming convention, keep the default name, ImageStudio, then select Create library. To keep several libraries apart, use ImageStudio- followed by a short name, such as ImageStudio-Marketing.
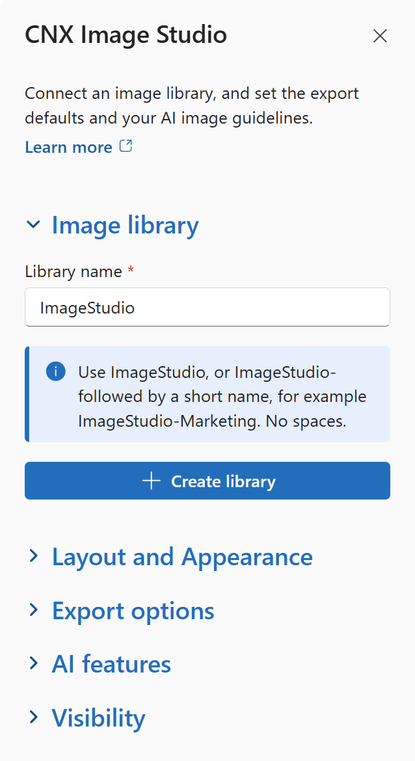
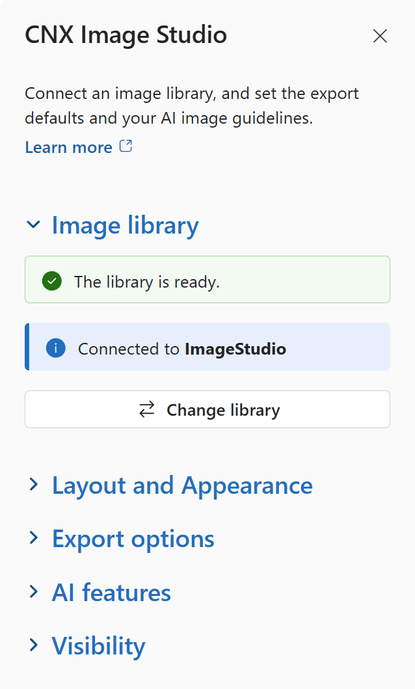
Image Studio creates and configures the SharePoint document library, with its columns, indexes and versioning. A confirmation appears when it's ready, with Change library to connect another one.
Step 5: Configure the Layout and Appearance section
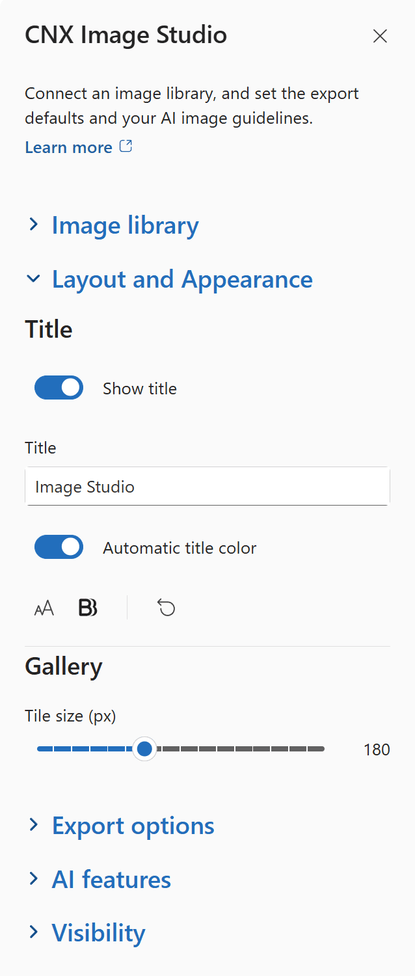
Expand Layout and Appearance. Turn off Show title if the page already has a heading or a banner, and set the gallery's Tile size (px) to suit the page layout.
Step 6: Configure the Export options section
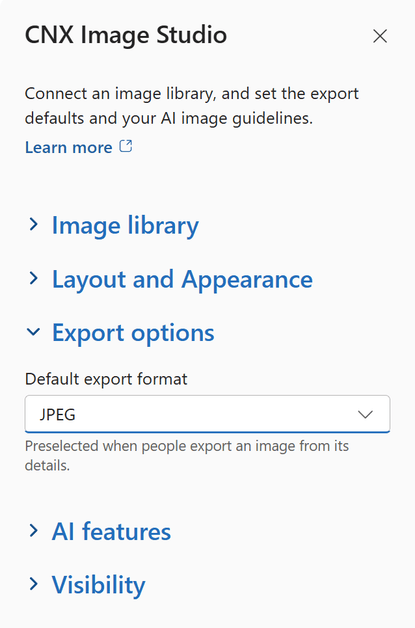
Expand Export options to choose the Default export format (PNG, JPEG, WebP or AVIF) preselected when people export an image.
Step 7: Configure the AI features section
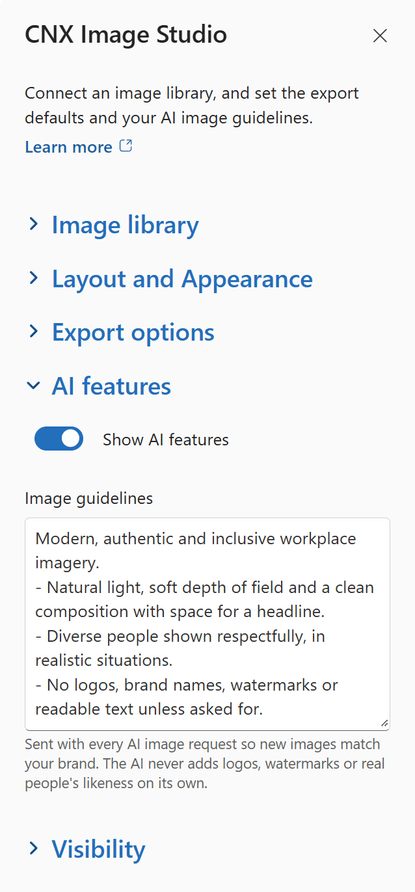
Expand AI features. Show AI features controls whether the AI actions appear. Add Image guidelines that describe your organization's visual style: they're included with every image request.
Important: AI features need the SharePoint AI Gateway, which an administrator connects once for the whole organization with CNX Azure AI Setup. Until it's connected, the AI options stay hidden, and page editors see a message that explains why. Nothing is sent to AI until an editor selects an AI action. Creating images also needs an image model; describing images works with the text model alone.
Step 8: Publish the page
Select Publish, then Publish again to make the page available. Image Studio is ready: select Upload to add your first image, or drag one onto the gallery.
Limits
Large libraries
- The gallery loads up to 2,000 images per visibility, newest first. Older images are found with the search box, through SharePoint Search.
- Uploads can be up to 100 MB. PDF, Illustrator and Photoshop previews come from SharePoint's preview service, and the first one can take a moment after an upload.
AI images
- AI can make mistakes: review every image and every description before you share them, and don't create images of real people without their consent.
- Images go to your organization's SharePoint AI Gateway only when someone uses an AI action, as a resized copy. The gateway doesn't store or log them.
- Each request counts toward the hourly AI limit (30 per person by default). In a large bulk upload, every image is stored, and the ones AI didn't describe can be described later.
Visibility
Personal images are hidden by the web part, not by SharePoint permissions: anyone who can read the library can still open them there.
Examples
Brand central
Keep approved photos and illustrations in one place, with alt text and tags, so everyone uses the right images.
Communications team
Export news and event images as wide banners or square posts, and create variations for different channels with AI.
Accessible intranet
Find the images that still need alt text with the **Needs alt text** filter, and let AI describe them in bulk.
Best practices
- Write image guidelines that reflect your brand before people start creating images with AI.
- Review AI alt text: it should say what the image shows and why it's there, in one short sentence.
- Keep work in progress as Personal or Draft, and publish only the images you've reviewed and are licensed to use.
- Label AI-generated images where your organization's policy requires it.
Release notes
Initial release
November 2026
- First release, included in CanoeUX SharePoint Web Parts Essentials.
Support
Have a question about CNX Image Studio, or found something that doesn't work as expected? Contact CanoeUX and tell us what you expected to happen and what happened instead. Screenshots help, and for display or access issues, so does the output of CNX User Diagnostics.
Planning a wider intranet? Explore our SharePoint and digital workplace services.
Free of charge
Support CanoeUX
CanoeUX SharePoint Web Parts Essentials is provided free of charge.
If these web parts helped you save time or deliver value to your organization, consider supporting future development.