SharePoint Web Parts Essentials
 CNX Azure AI Setup
Connect Azure AI once for every CNX web part: deploy the SharePoint AI Gateway, connect it, check it, and add or change AI models from one SharePoint page.
Overview
CNX Azure AI Setup is the one place where a SharePoint administrator connects Azure AI to the CNX web parts. Set it up once, and every CNX web part that uses AI (such as CNX Icon Studio, CNX Image Studio, CNX SharePoint Control+, CNX User Diagnostics and the message editor shared by several web parts) can use it, with no setup of its own.
It guides you through three steps: deploy the SharePoint AI Gateway to your own Azure subscription, connect it to all the web parts, and check that it works. Afterwards, come back to the same page to add or change AI models, run the checks again, or remove everything the setup created.
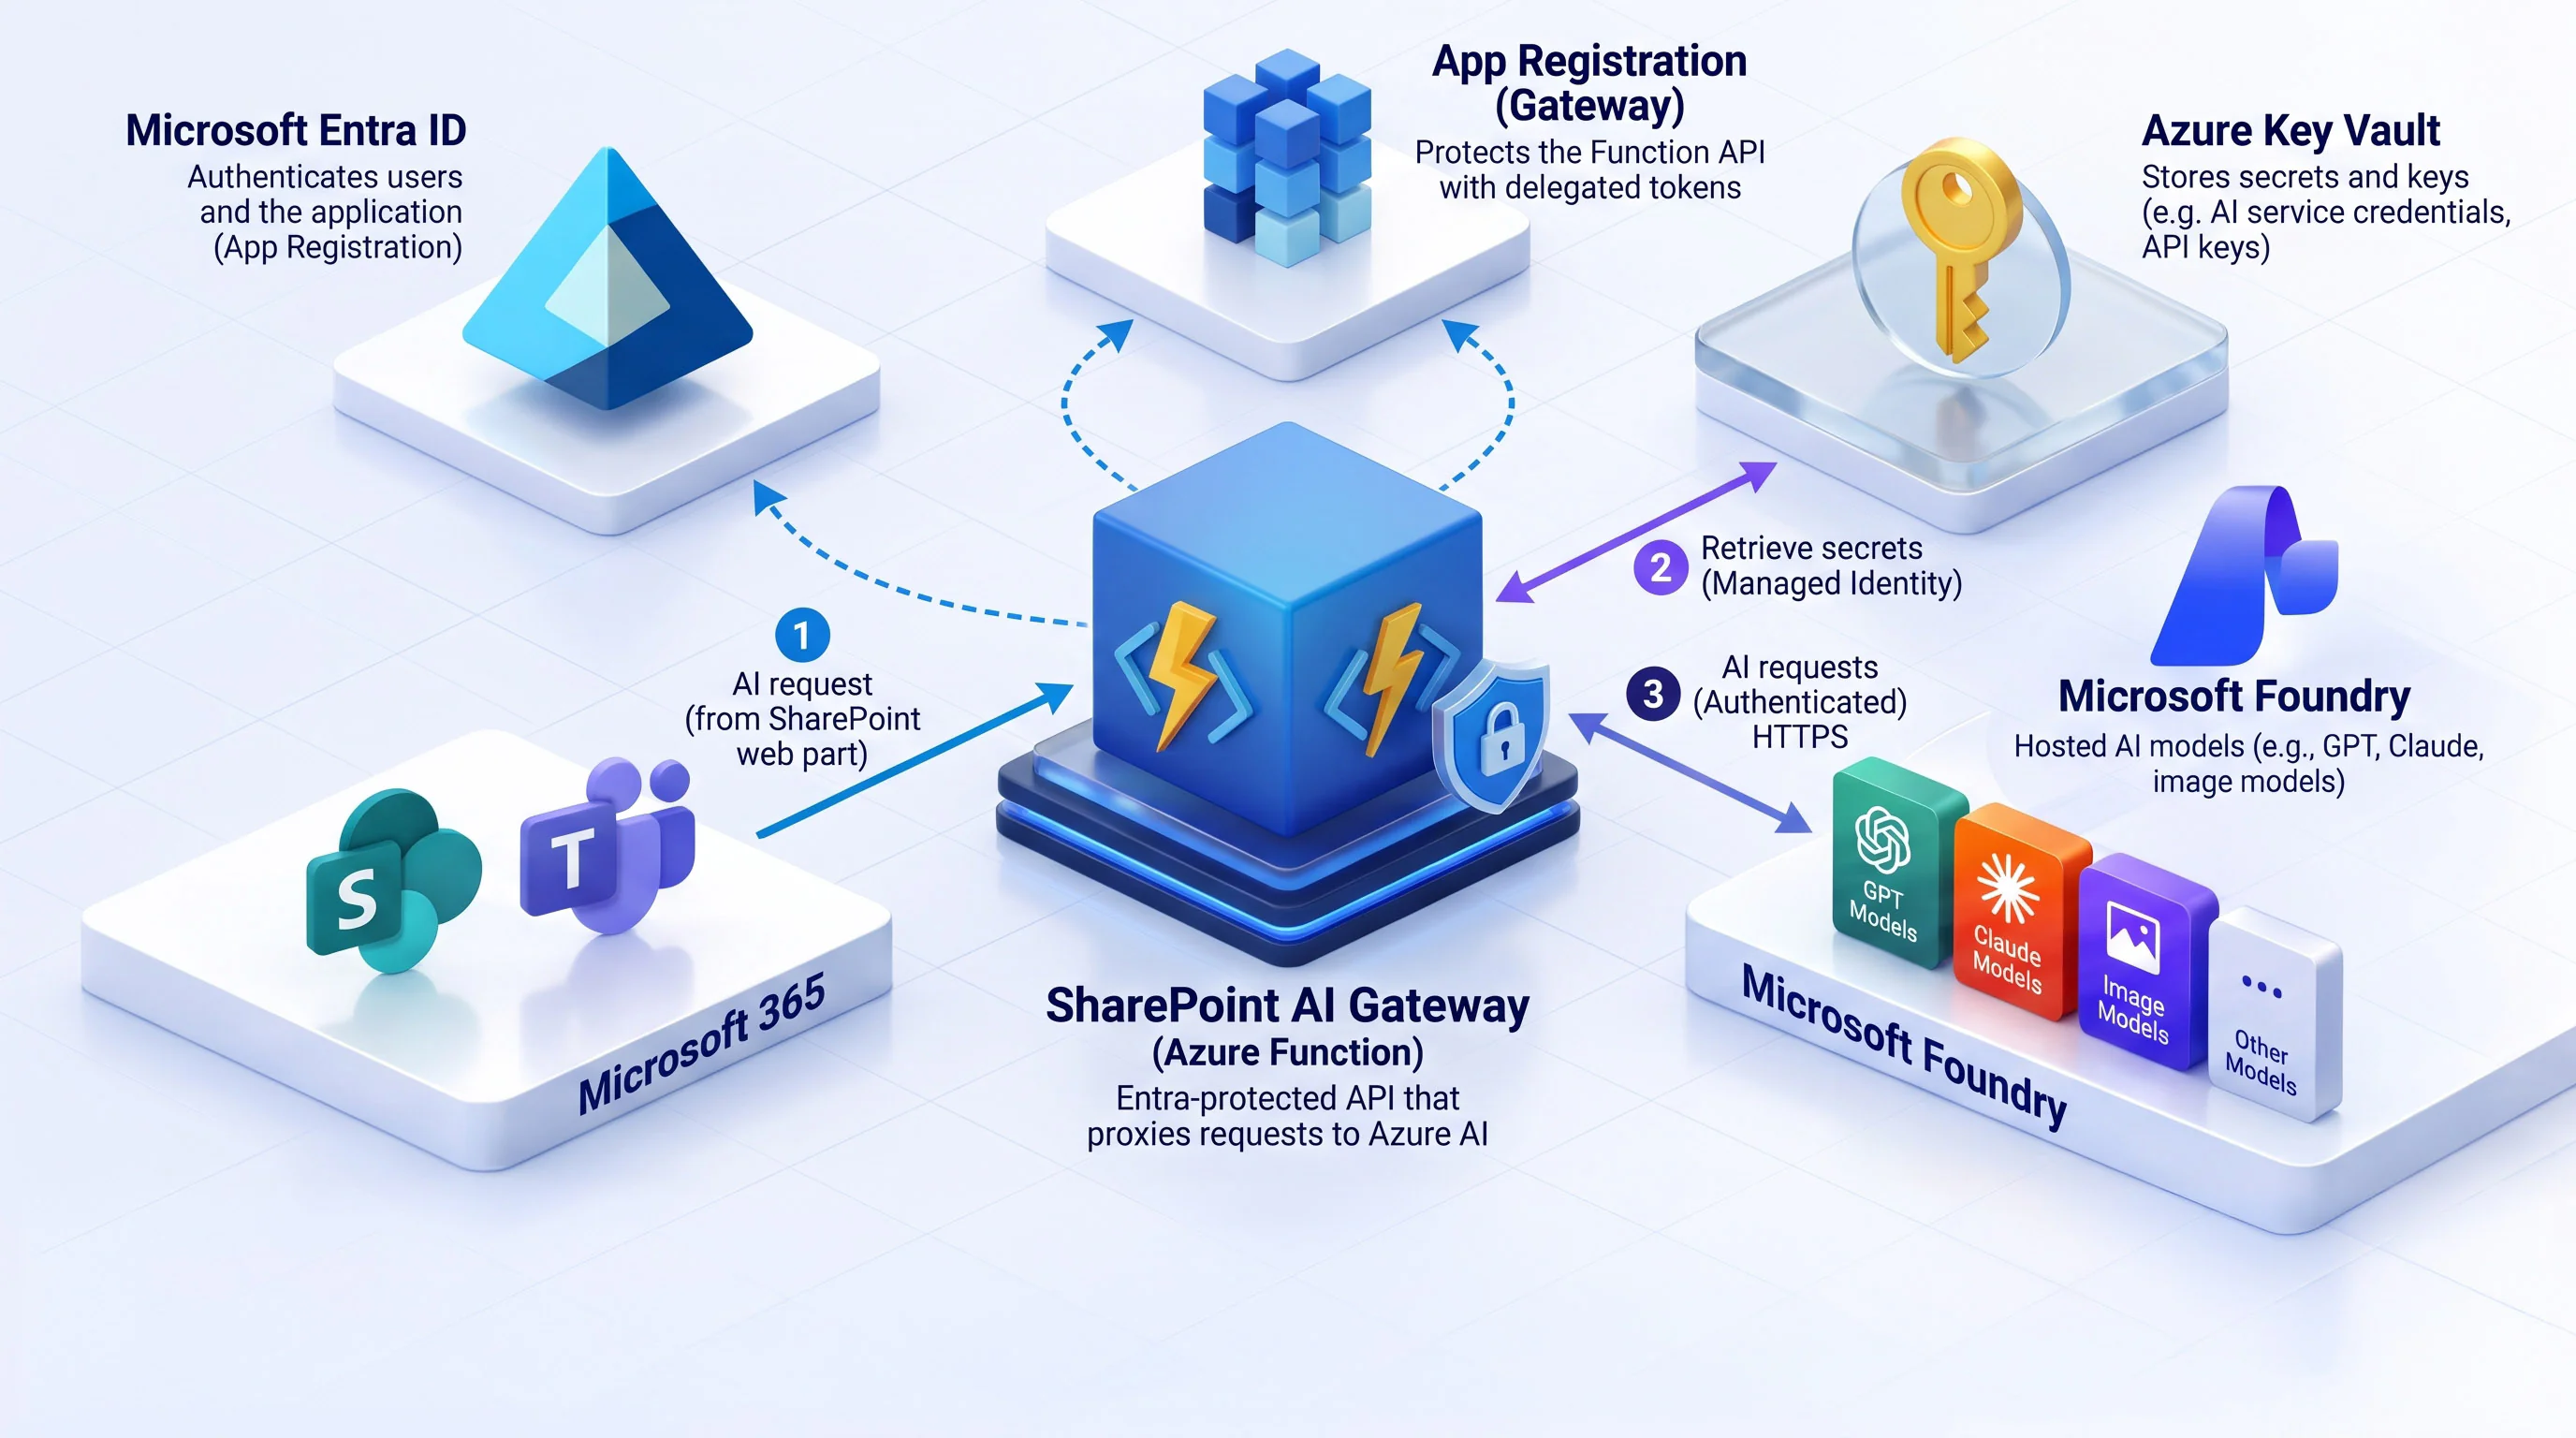
The gateway runs in your Azure subscription, in front of Azure AI Foundry and the models you choose: GPT for text, Claude if you want it, and an image model for web parts that create images. CanoeUX never sees your data, and the web parts don't collect it. The Azure and AI services you deploy are billed to your subscription, under their own terms.
Features
One setup for every web part
The gateway's address is saved once for your whole organization, so every CNX web part that uses AI finds it on its own. Readers of the page simply see whether AI is ready and which models are available; page editors see the full setup.
Your own gateway, in your own Azure subscription
The SharePoint AI Gateway is an Azure Function protected by Microsoft Entra ID: only signed-in people in your organization can use it. It keeps its secrets in Azure Key Vault, reaches Azure AI Foundry with a managed identity, limits how many AI requests each person can make per hour, and doesn't store or log the prompts, images or content it receives.
Guided deployment
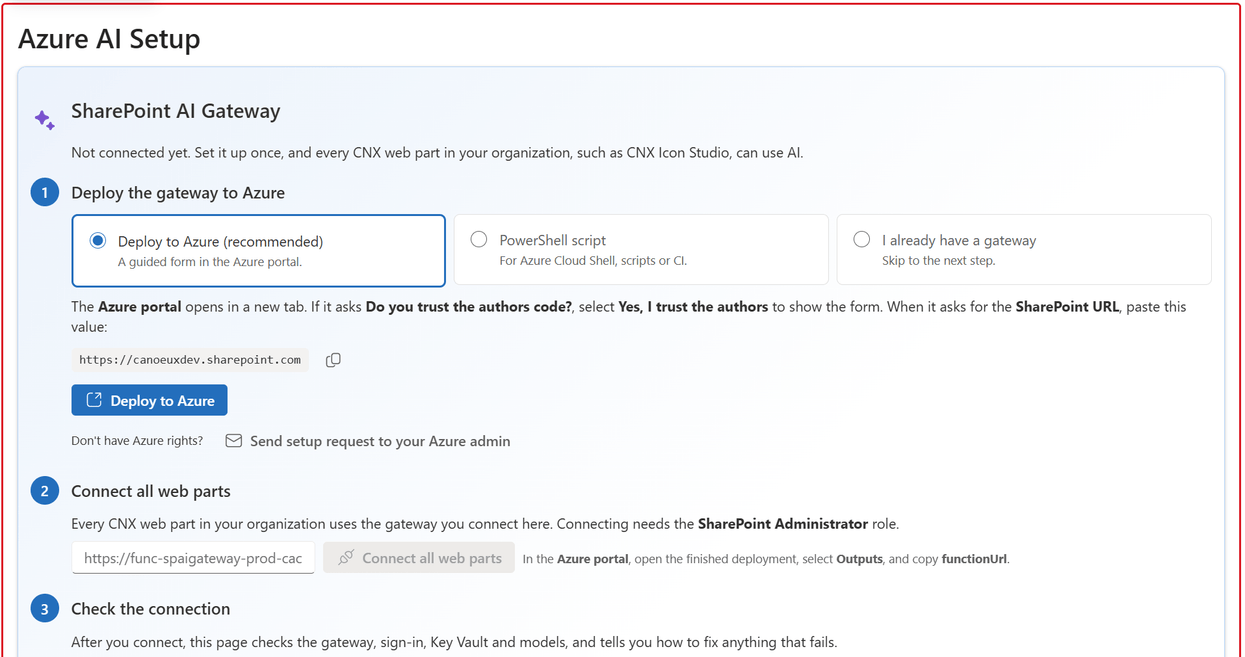
Deploy to Azure opens a guided form in the Azure portal, with the values it needs shown on the page, ready to copy. Prefer the command line? Run one command in Azure Cloud Shell instead. No Azure rights? Send setup request to your Azure admin emails them the link, the values and the remaining steps.
Checks that explain what to fix
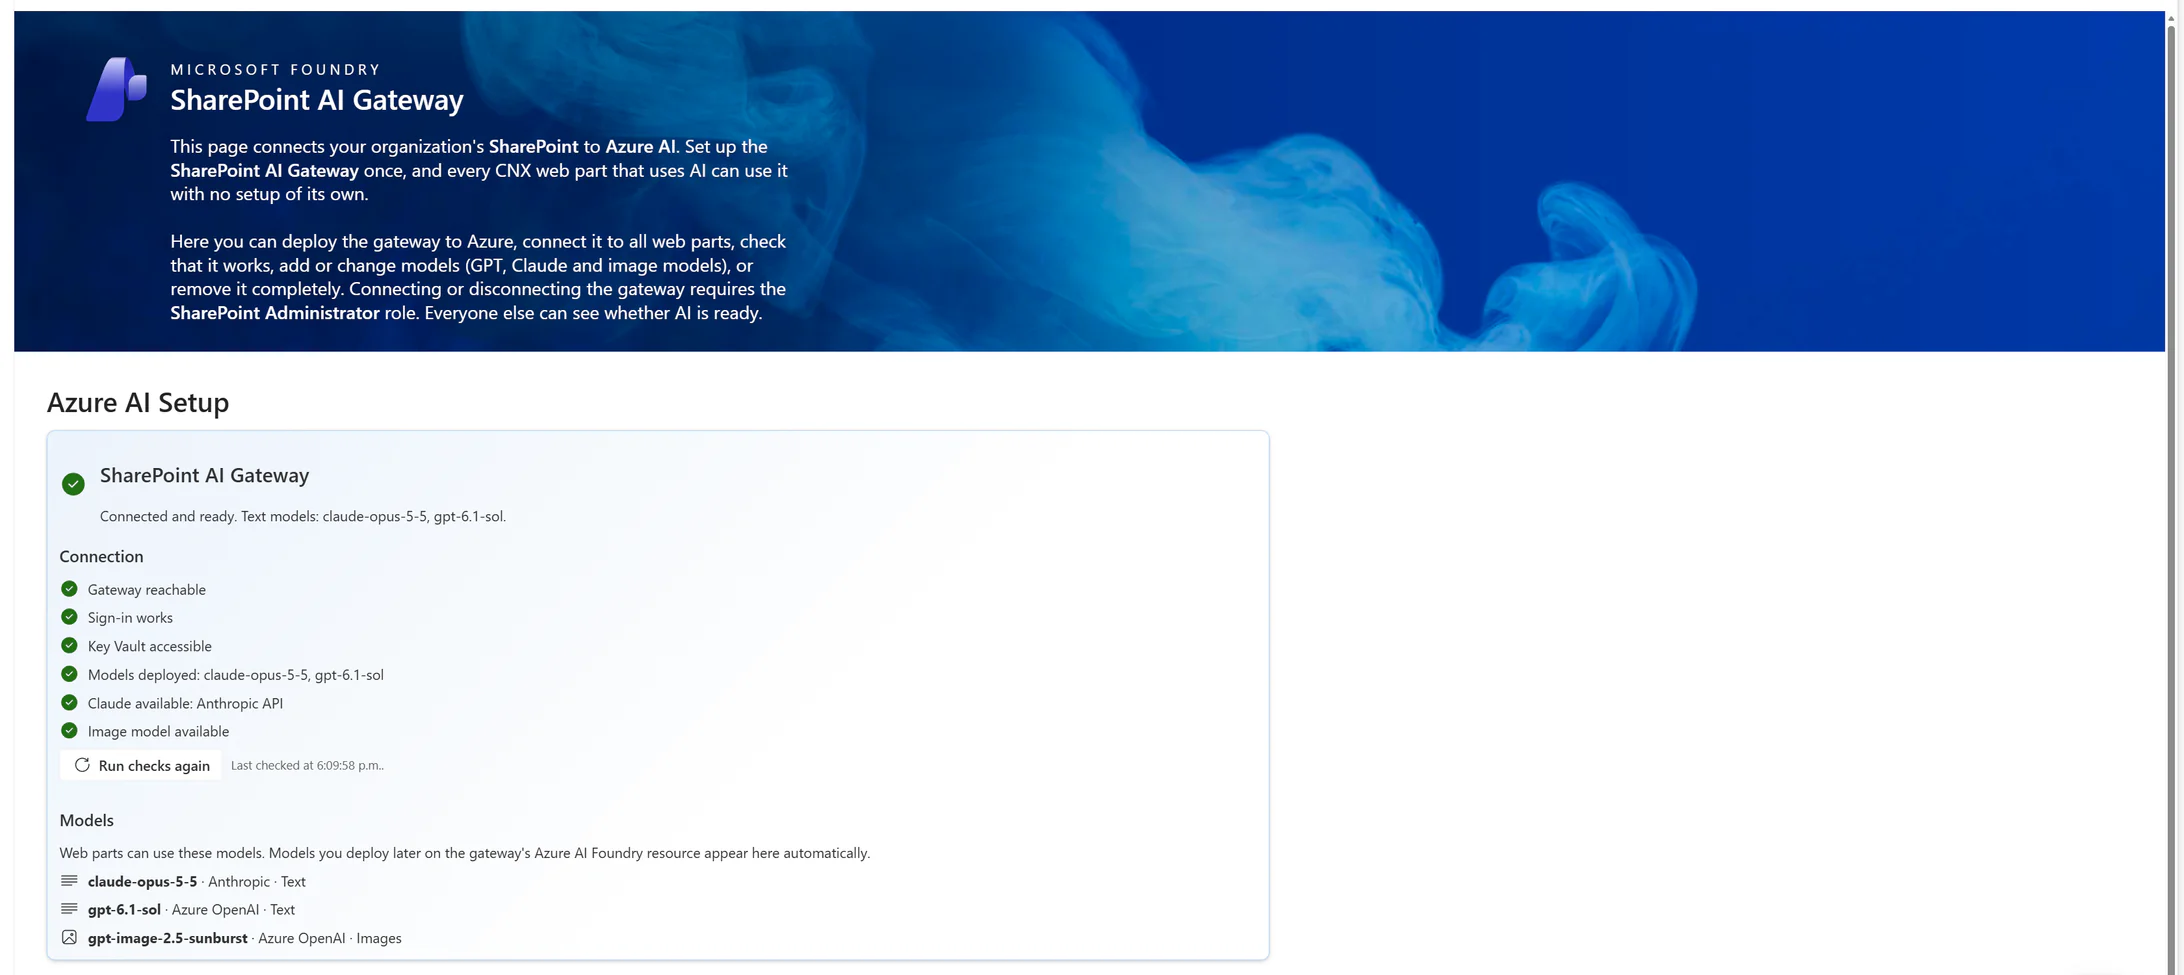
After you connect, the web part checks that the gateway answers, that sign-in works, that Key Vault is reachable and that models are deployed, and explains how to fix anything that fails. Select Run checks again at any time.
The newest models, your choice
The setup deploys GPT-6.1 Sol for text by default, Claude Opus 5.5 if you want it (with your own Anthropic API key or deployed in Azure), and GPT-image-2.5 Sunburst for images. Any other GPT, Claude or image model you deploy later on the same Azure AI Foundry resource is found automatically, with no redeployment.
Clean removal
When you no longer need AI, one Cloud Shell command deletes everything the setup created in Azure and Microsoft Entra ID, and Disconnect all web parts removes the connection from SharePoint.
Configuration
After the CanoeUX SharePoint Web Parts Essentials package has been deployed to your SharePoint tenant, add CNX Azure AI Setup to a SharePoint page, then follow its three steps to connect Azure AI. You need an Azure subscription where you have Owner rights, and a SharePoint Administrator to connect the web parts.
Step 1: Create a page for the setup
Create a SharePoint page to host the web part. You can use any site where you have permission to edit pages, but a site for administrators is recommended. You'll come back to this page to check the gateway and manage the AI models.
Important: Everyone who can open the page can see whether AI is ready. Only page editors see the setup, and only a SharePoint Administrator can connect or disconnect the web parts.
Step 2: Add the web part
- Select Edit in the upper-right corner of the page.
- Hover over the section where you want the web part to appear, and select + Add a new web part.
- Search for CNX, and then select CNX Azure AI Setup.
The web part shows its three steps: Deploy the gateway to Azure, Connect all web parts and Check the connection, followed by Remove the gateway.
Step 3: Deploy the gateway to Azure
In step 1, choose how to deploy the gateway.
Available options
Deploy to Azure (recommended)
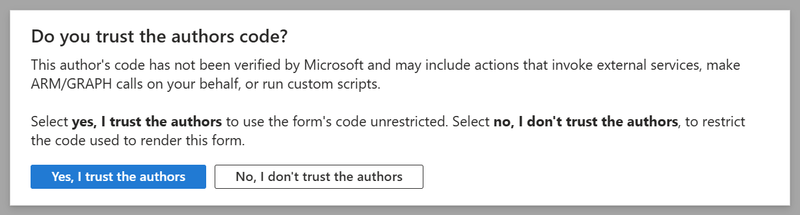
Copy the SharePoint URL shown on the page, then select Deploy to Azure. The Azure portal opens in a new tab. If it asks Do you trust the authors code?, select Yes, I trust the authors to show the form.
PowerShell script
Prefer to review the deployment first? Copy the command shown and run it in Azure Cloud Shell (Bash or PowerShell), signed in with Owner rights on the subscription. Or select Download the script, review it, and run it from your own scripts or pipelines.
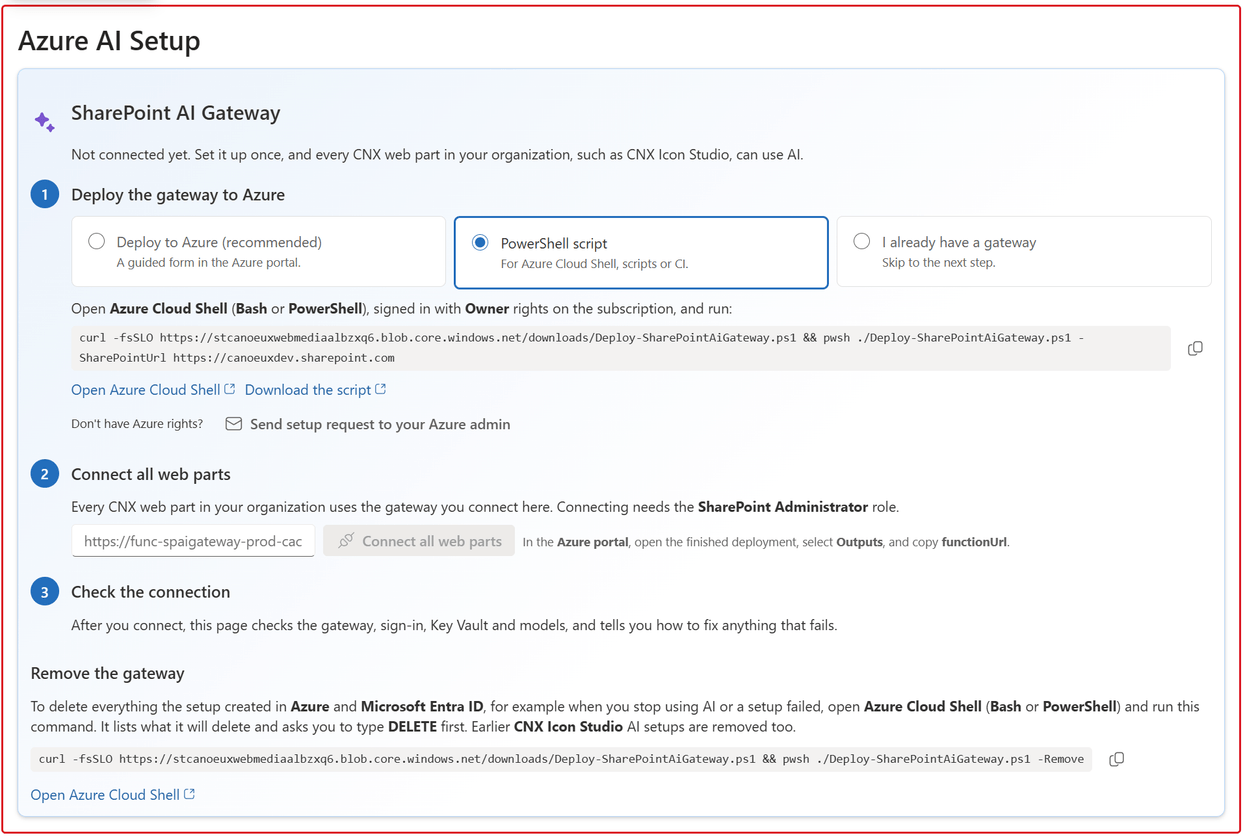
I already have a gateway
If the gateway is already deployed, skip to step 2. You'll need its Function URL.
Send setup request to your Azure admin
If you don't have Azure rights, select Send setup request to your Azure admin. They receive the link, the SharePoint URL, the command and the remaining steps by email.
Step 4: Fill in the Azure form
The Set up the SharePoint AI Gateway form has one Settings tab.
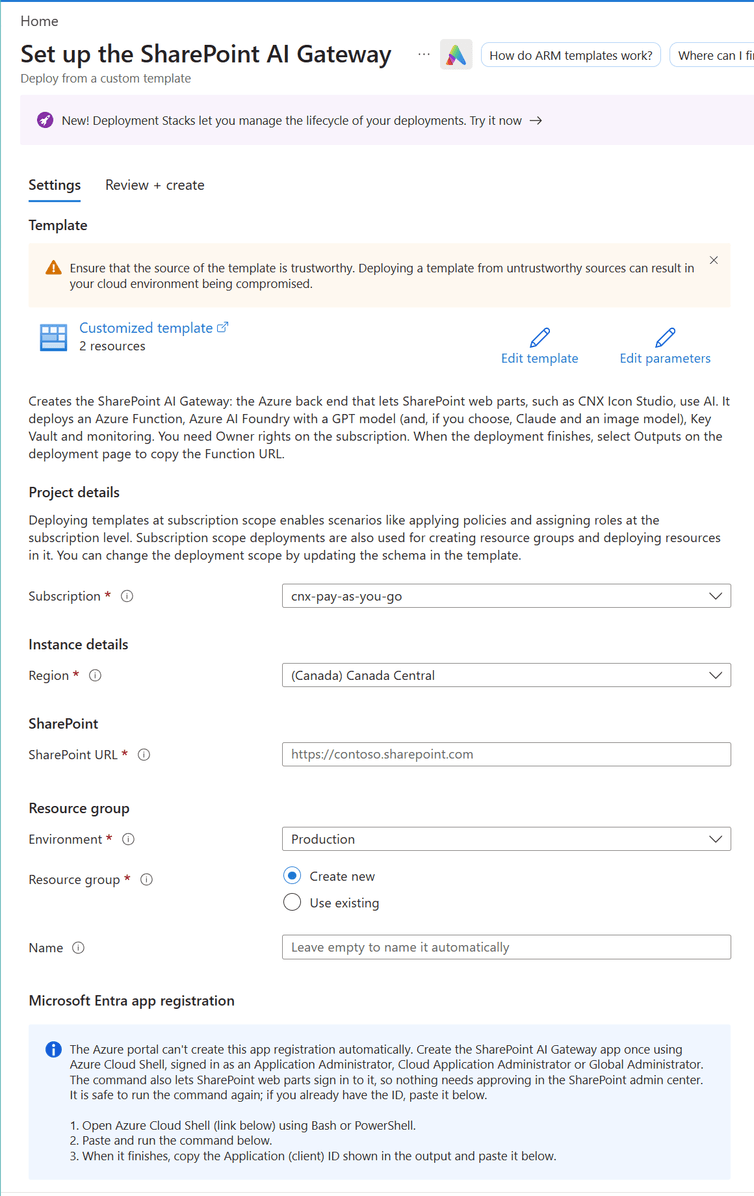
Available options
Subscription, region and SharePoint
Choose your Subscription and the Region for the gateway's resources, then paste the SharePoint URL you copied from the setup page.
Resource group
Choose an Environment, then Create new or Use existing. For a new resource group, leave Name empty and it's named for you, for example rg-spaigateway-prod-cac.
Microsoft Entra app registration
The Azure portal can't create the app registration that protects the gateway, so the form gives you a command for it. You need the Application Administrator, Cloud Application Administrator or Global Administrator role.
- Select Open Azure Cloud Shell, and copy the Command from the form.
- Paste the command into Cloud Shell, press Enter, and wait for it to finish.
- Copy the Application (client) ID it prints, and paste it into the form.
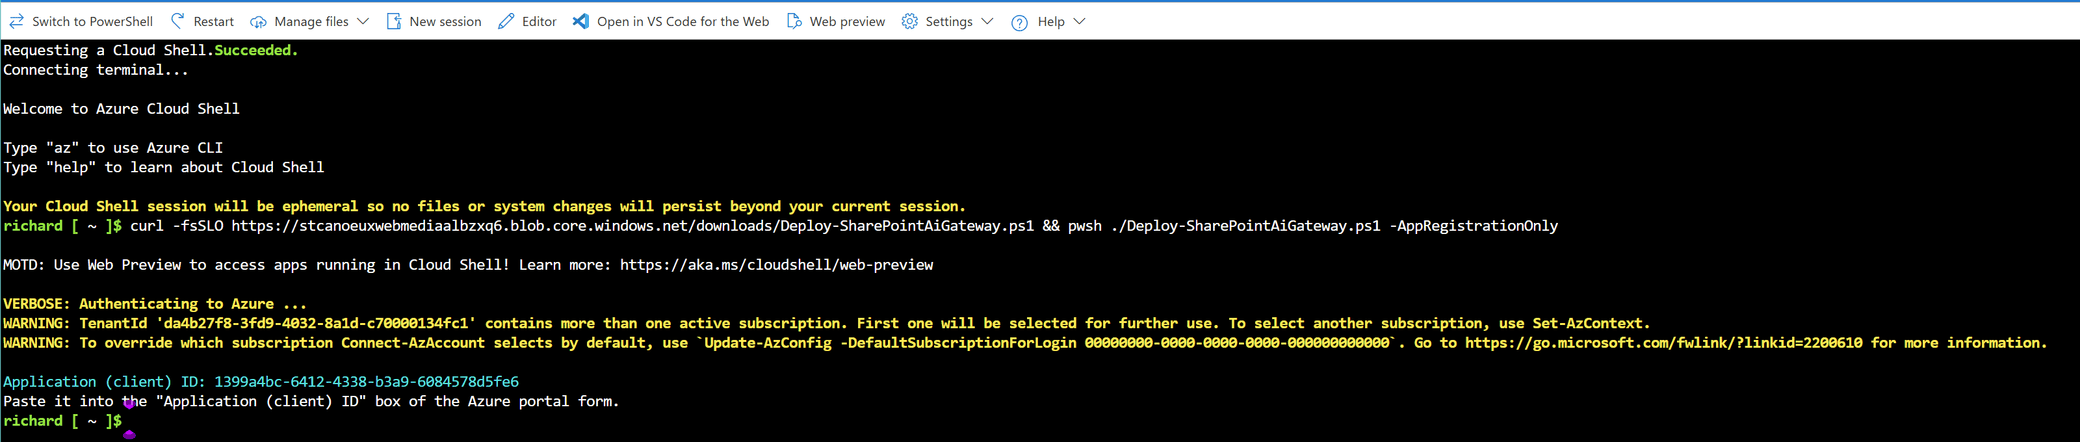
Tip: The command also lets SharePoint web parts sign in to the gateway, so there's no API access request to approve in the SharePoint admin center.
AI region and models
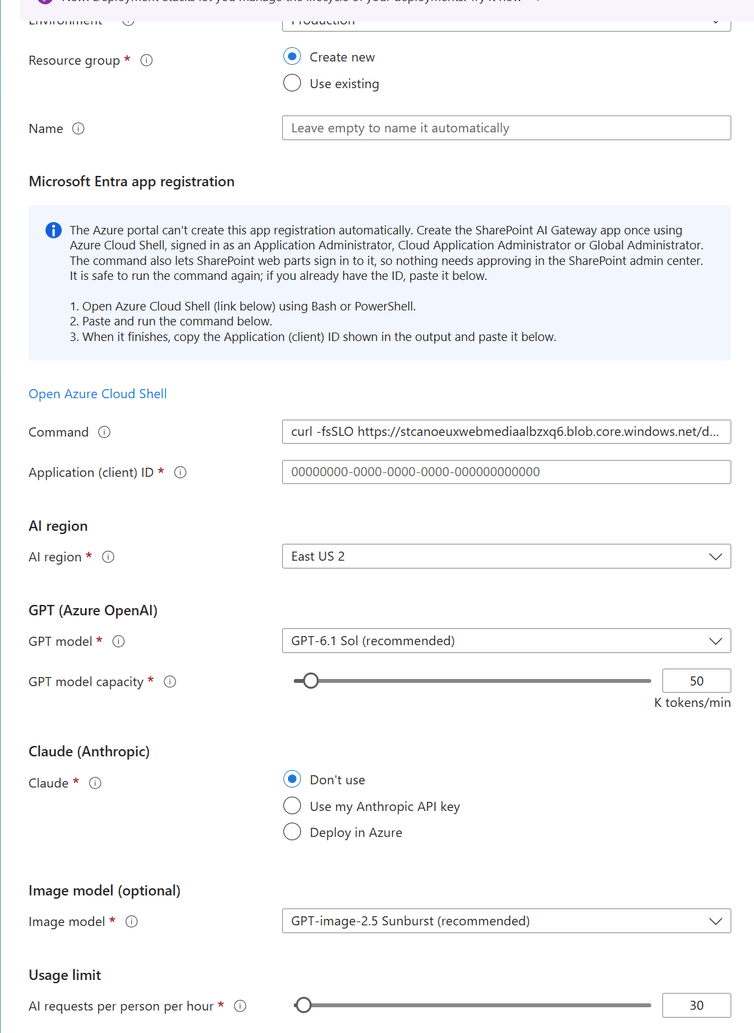
- AI region: where AI requests are processed. It can differ from the region of the other resources. East US 2 and Sweden Central offer the newest GPT, Claude and image models.
- GPT model: GPT-6.1 Sol is recommended. The form checks your subscription's quota and uses the deployment type that has room.
- Claude: Don't use, Use my Anthropic API key (stored in Key Vault) or Deploy in Azure.
- Image model (optional): GPT-image-2.5 Sunburst for quality, GPT-image-2.5 Flare for speed, GPT-image-2 for high resolution, or Don't deploy if no web part will create images.
- Usage limit: how many AI requests each person can make per hour (30 by default).
Review and create
Select Review + create, check the configuration, and start the deployment. It normally takes a few minutes.
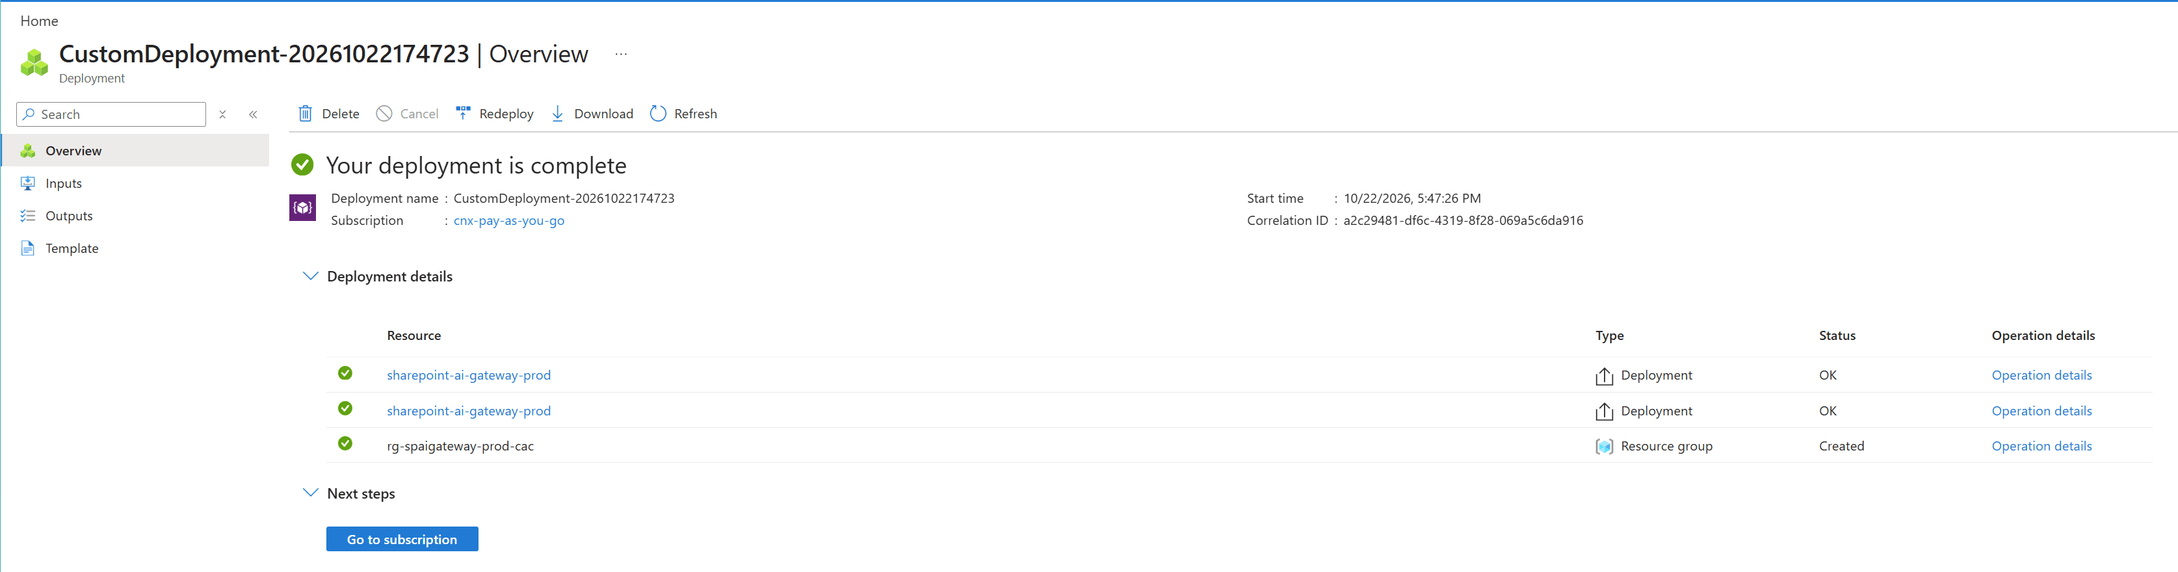
Step 5: Connect all web parts
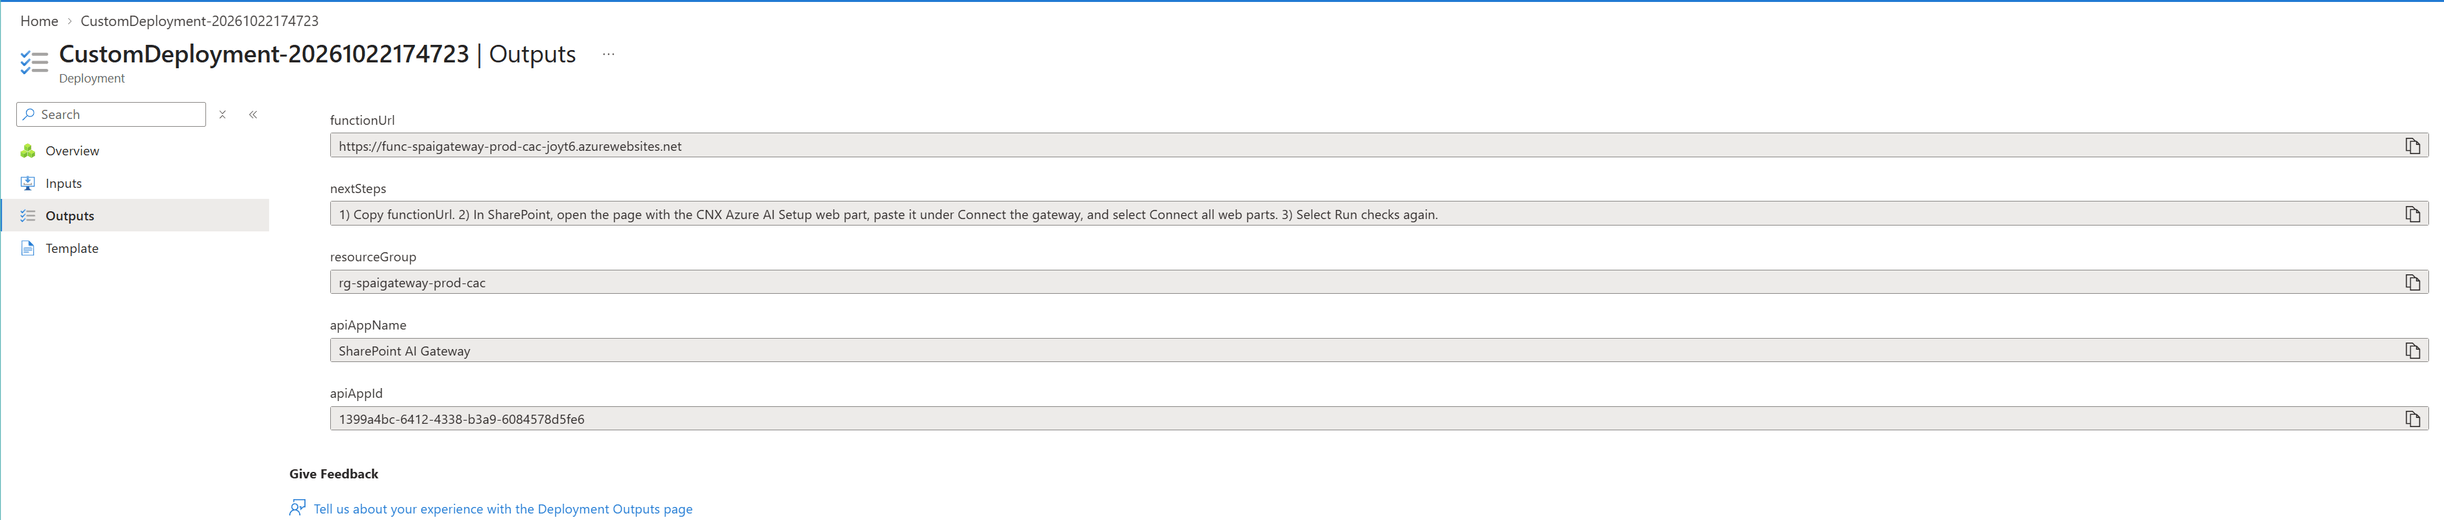
- When Azure reports that the deployment is complete, select Outputs in the deployment's navigation.
- Copy the value of functionUrl, at the top of the list.
- Back on the SharePoint page, paste it into step 2, and select Connect all web parts.
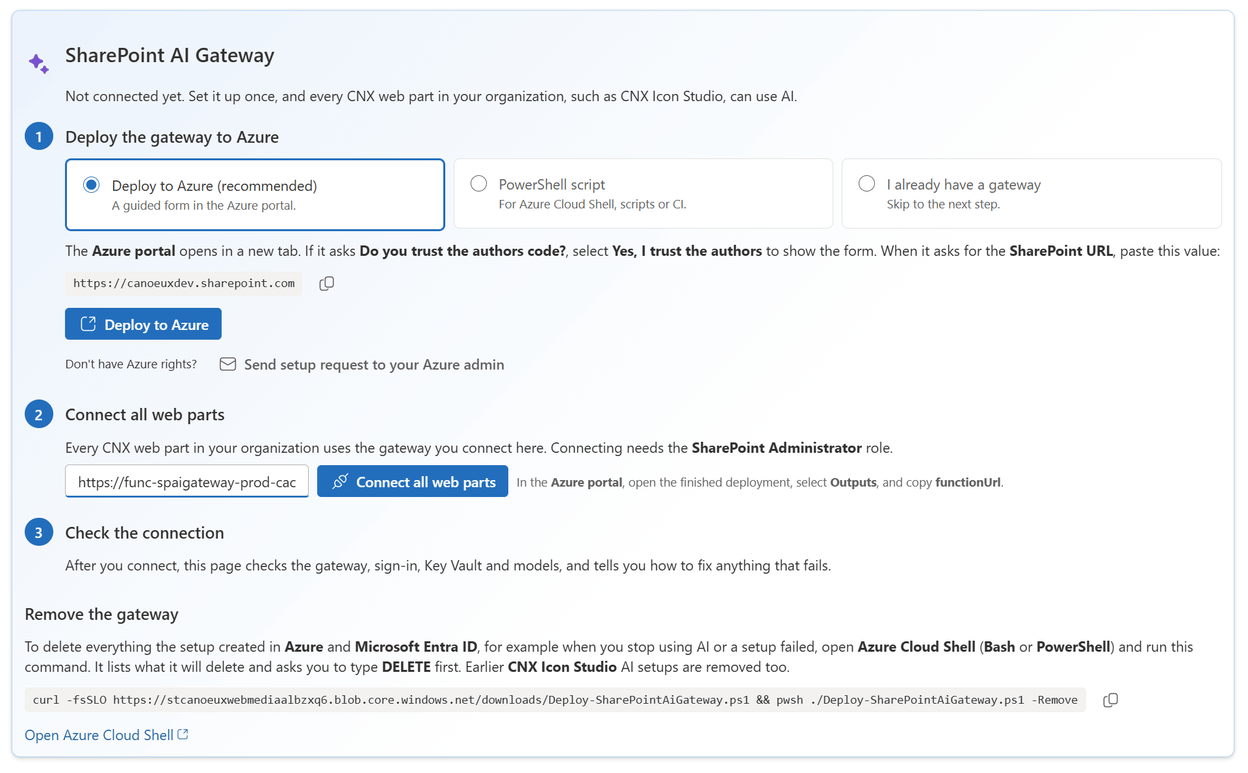
Important: Connecting needs the SharePoint Administrator role, because the connection is saved for your whole organization. Without it, the page shows a PnP PowerShell command to pass on to a SharePoint administrator. The web part checks the address first, so a wrong one is never saved.
Step 6: Check the connection
After you connect, the web part checks the gateway, sign-in, Key Vault and the models, and lists what passed and what needs attention, with how to fix it. It then lists every model the web parts can use, with its provider and whether it writes text or creates images.
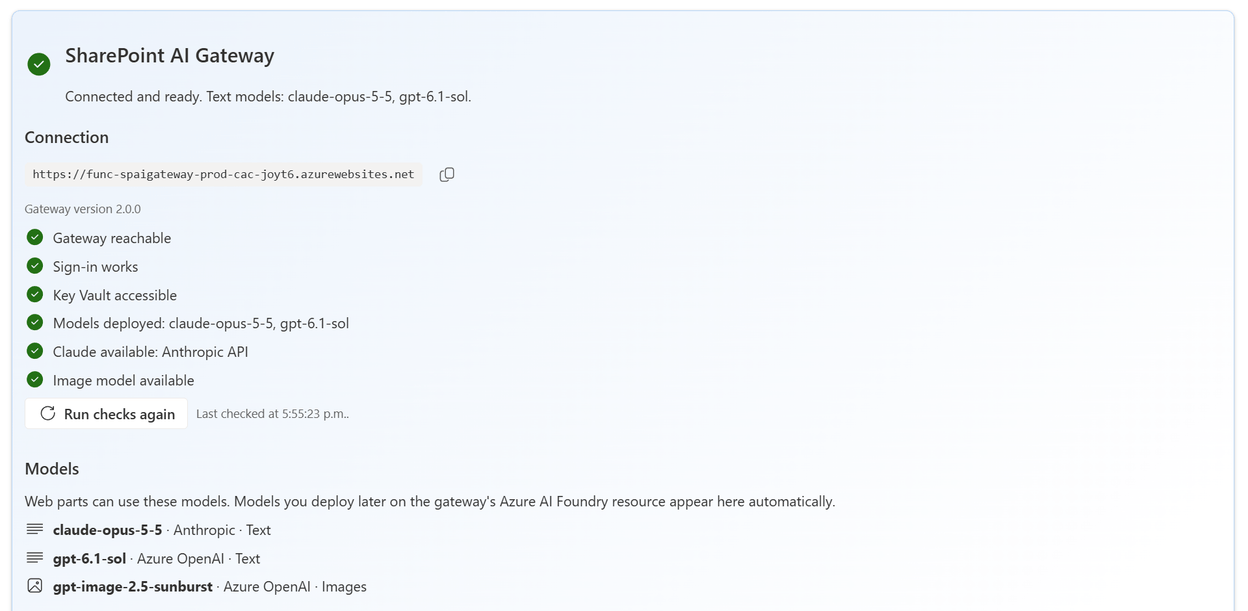
Step 7: Add or change models
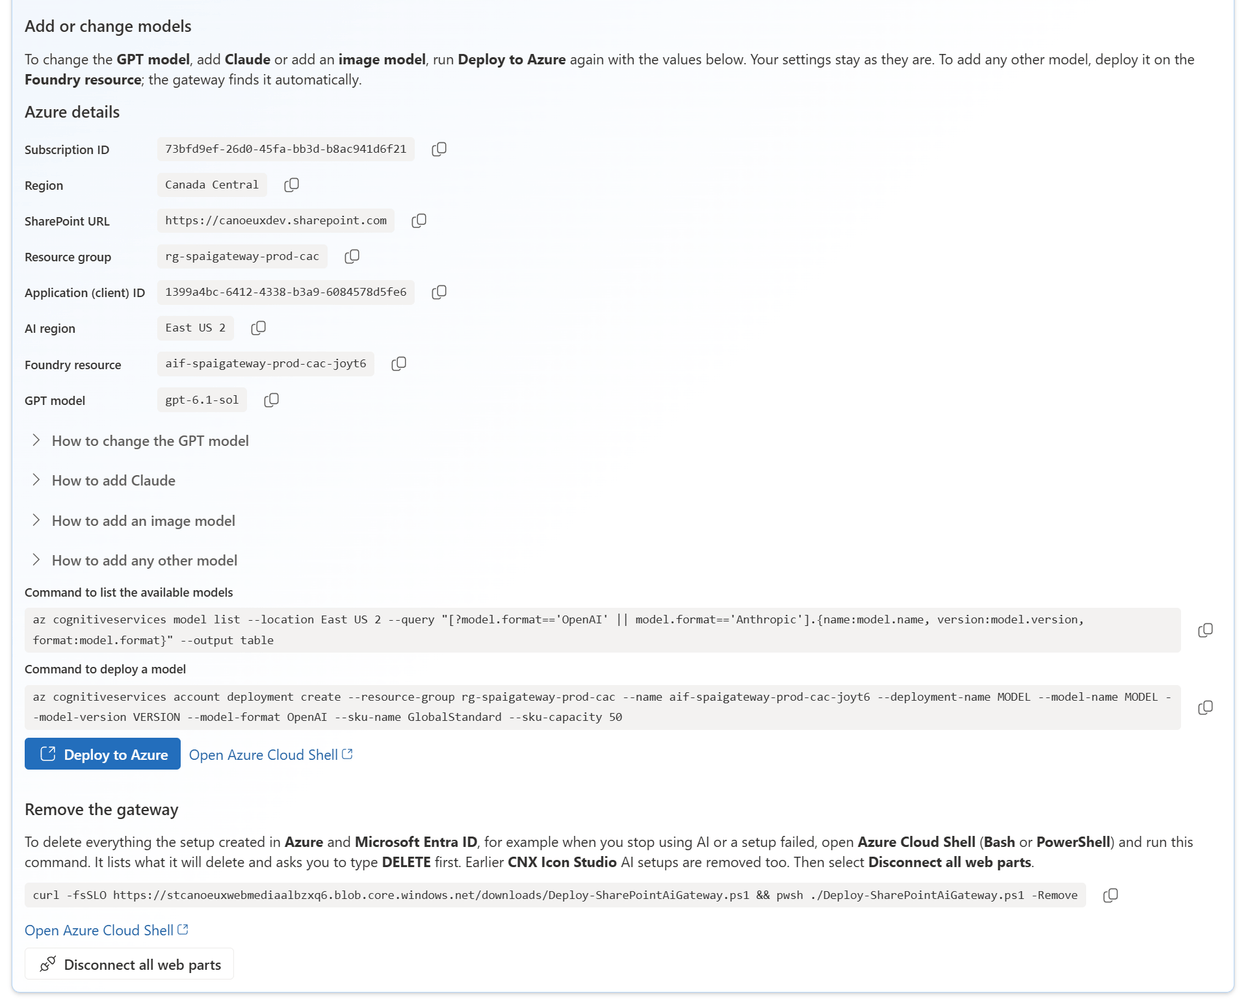
Come back to this page whenever you need to change the GPT model, add Claude, add an image model or deploy any other model. Add or change models shows the values the Azure form asks for, ready to copy, and step-by-step guides for each change. Models you deploy on the gateway's Azure AI Foundry resource appear automatically.
Step 8: Publish the page
Select Publish (or Republish) in the upper-right corner. The page stays your control point for AI: come back to it to run the checks again, review the models, or remove the gateway.
Limits
Requirements
- An Azure subscription where you have Owner rights, and quota for the models you choose in the AI region.
- The Application Administrator, Cloud Application Administrator or Global Administrator role for the app registration.
- The SharePoint Administrator role to connect or disconnect the web parts.
Costs and usage
- The gateway, Azure AI Foundry and the models run in your subscription and are billed by Microsoft (or by Anthropic, when you use your own API key), under their own terms.
- Azure never deletes a model when you switch to another: the old one costs nothing unless it's used, but keeps its quota until you delete it.
- The hourly limit applies to each person, and counts every AI request from every web part.
Remove the gateway
Run the command shown under Remove the gateway in Azure Cloud Shell. It lists what it will delete and asks you to type DELETE first, then removes everything the setup created, including earlier CNX Icon Studio AI setups. Then select Disconnect all web parts on the page.
Examples
IT administration site
Keep the setup on a page of your IT or Microsoft 365 administration site, where administrators check the gateway and manage the models.
A pilot before a wider rollout
Deploy the gateway with a low usage limit, turn on AI in a few web parts on pilot sites, then raise the limit when you're ready.
Best practices
- Choose an AI region close to your users that offers the models you need, and check your subscription's quota before you deploy.
- Keep the usage limit modest at first, and review your Azure costs after the first weeks.
- Run the checks again after any change in Azure, and before you turn on AI in more web parts.
- Tell people which web parts use AI, and that they should review AI results before using them.
- Delete models you no longer use, so they don't hold your quota.
Release notes
Initial release
November 2026
- First release, included in CanoeUX SharePoint Web Parts Essentials.
Support
Have a question about CNX Azure AI Setup, or found something that doesn't work as expected? Contact CanoeUX and tell us what you expected to happen and what happened instead. Screenshots help, and for display or access issues, so does the output of CNX User Diagnostics.
Planning a wider intranet? Explore our SharePoint and digital workplace services.
Free of charge
Support CanoeUX
CanoeUX SharePoint Web Parts Essentials is provided free of charge.
If these web parts helped you save time or deliver value to your organization, consider supporting future development.